Setup Amazon CloudFront CDN WordPress using W3 Total Cache
Amazon Web Services (AWS) has provides lot of products in various technology to the individual to enterprises level. AWS CloudFront is a global content delivery network (CDN) which delivers data in very high speed. Below I have given the detailed step by step guide for integrating Amazon CloudFront CDN WordPress using W3 Total Cache plugin.
Setting up Amazon CloudFront CDN WordPress
- Sign in to AWS console. (If you are a new customer, signup AWS console and get 12 months free tier.)
- On the top menu bar, select Services and click CloudFront under the Networking & Content Delivery group.
- Click Create Distribution button. Here the delivery method is Web so under the Web, click Get Started button.
- Type Origin Domain Name and Origin ID as yoursitename.com. (For example, my website name is spytm.com so I will give the Origin Domain Name and Origin ID as spytm.com.)

- Leave the remaining options untouched and click the Create Distribution button.
- Now you can see the Status of your distribution as In Progress. It will take maximum 20 minutes to deploy your website into CloudFront and once it is done, then the status will be changed to Deployed.
- In the CloudFront Distributions dashboard, click the ID. In the General tab, copy the domain name. (For example: if the domain name is d5ygs27y188890r.cloudfront.net, then copy only the first part – d5ygs27y188890r)

See Also: 10+ Most Common WordPress Mistakes to Avoid
Creating Access Keys in Amazon Web Services
- On top right bar, Click your name and select My Security Credentials.
- Close the popup. From the left menu bar, select Groups and click Create New Group button. Type the name of the group and click the Next Step button.
- Tick the AdministratorAccess policy name and click Next Step button.
- Review the group name & policy and click the Create Group button.
- From the left menu bar, click Users and click the Add user button.
- Type the User name and tick the Programmatic access as an access type. Click the Next: Permissions button.
- Tick the Group name which you have created earlier and click the Next: Review button.
- Review the User details and click Create user button.
- Copy the Access key ID and the Secret access key and safely store it in somewhere. (You cannot recover the Secret access key again. This is the only page where you can get the Secret access key. If you lost the Secret access key, then you have to create a new Access key ID and its corresponding Secret access key in the Users page.)
See Also: Top 16 Best Free Essential WordPress Plugins
Integrating CloudFront into WordPress using W3 Total Cache Plugin
- Install and activate the W3 Total Cache Plugin in your WordPress site.
- Goto W3 Total cache plugin settings page (Performance) and click “General Settings” option.
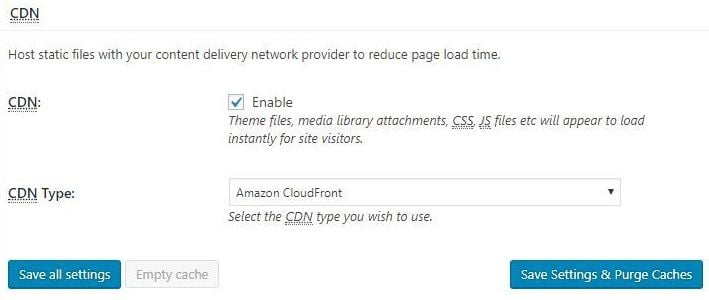
- Under the CDN box, tick the CDN field as Enable and select the CDN Type as Amazon CloudFront under Origin Pull / Mirror section. Click Save all settings button.

- Under the W3 Total Cache settings page (Performance) tab, select CDN.
- In the General box, tick the Host attachments, Host wp-includes/files, Host theme files, Host minified CSS and JS files and Host custom files fields.
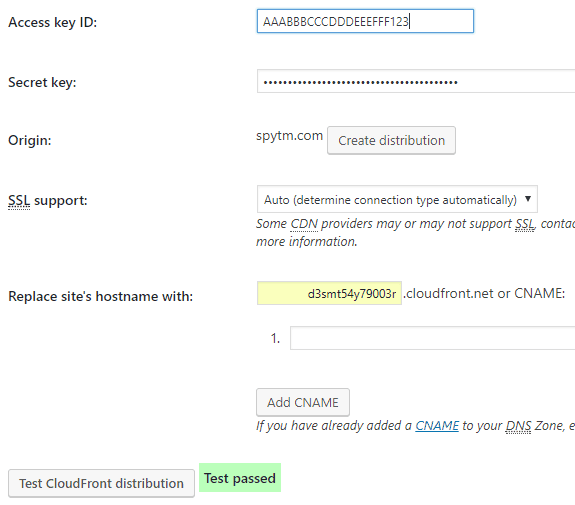
- In the Configuration box, paste the Access key ID and Secret key which you have copied earlier. Paste the domain name (example: d5ygs27y188890r) in the Replace site’s hostname with field.

- Then click Test CloudFront Distribution button to test the successful connection between WordPress and CloudFront. If the connection is established then you can see the message as Test passed.
- Click Save all settings button and purge all the caches to delete the old cached data.
See Also: Top 3 Best Free WordPress Security Plugins
Manually test the Amazon CloudFront CDN WordPress Website
- You can check and confirm by your images URL. Your website images URL would have been changed to something like domainname.cloudfront.com/xyz…………….
- If you see the above URL format, then you can confirm that your WordPress website has been successfully integrated to the Amazon Web Services CloudFront.
See Also: How to make WordPress site Load Faster
Setting up CNAME to change URL format (Optional)
By default, your cdn URL will be look like domainname.cloudfront.com. Instead of using the default cloudfront URL, you can use your own domain name by creating a CNAME. (For example: my CDN URL can be changed from d5ygs27y188890r.cloudfront.net to cdn.spytm.com.)
1. Add CNAME in your hosting provider cPanel
- Login to your hosting provider cPanel.
- Under Domain box, select DNS Manager or Zone Editor. (This name may vary depends upon the hosting provider.)
- Under your WordPress site name, enter CNAME NAME/HOST as cdn (your choice but you have to use the same in the upcoming steps) and CNAME/Points to as CloudFront domain name (example: d5ygs27y188890r.cloudfront.net). Now we have created CDN link as cdn.yoursitename.com. (For example: for my website, it is cdn.spytm.com).
- Save it if required.
See Also: Prevent WordPress Content Theft – text and images
2. Update CNAME in AWS CloudFront
- In the CloudFront Distributions dashboard page, click the ID.
- Click Edit button.
- In the Alternate Domain Names (CNAMEs) field, enter the cdn.yoursitename.com.
- Click the Yes, Edit button to save the CNAME.
3. Update CNAME in W3 Total Cache settings
- Goto CDN page in W3 Total Cache settings page (Performance).
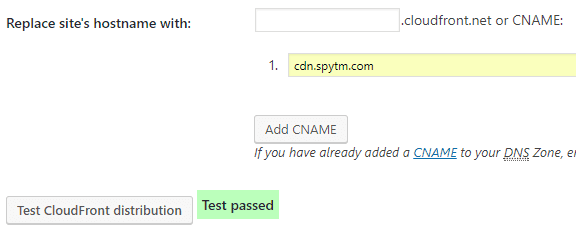
- In the Configuration box, in the Replace site’s hostname with field, remove the domain name which we have placed before and enter the CNAME as cdn.yoursitename.com.

- Click the Test CloudFront distribution button to ensure that the CNAME is correctly configured.
- Once you have got the success message as Test passed, Click the Save all settings button and purge all the caches to delete the old cached data.
- In the Advanced box, tick the Set cookie domain option and save the settings.
4. Update CNAME in Cloudflare account (Skip this step if you are not using the Cloudflare)
- Login to your Cloudflare account.
- Click the DNS icon from the menu bar.
- Select Type as CNAME from the dropdown.
- Enter Name as cdn. (Created in cPnael)
- Enter Value as domainname.cloudfront.com (copied from the CloudFront Distributions dashboard)

- Change the orange cloud icon to the grey cloud icon by just clicking the icon.
- Click the Add Record button.
5. Manually test the CNAME as CDN URL
- You can check and confirm by your images URL. All your WordPress website images would have URL starting as cdn.yoursitename.com/xyz…………….
- If you see the above URL format, then you can confirm that your CNAME setup is successful.
- If you see any error in opening the URL, then please try again after 24 hours.
Post your experience and queries on the below comments section, we will get back to you with proper resolution.


Why no minify?
minify settings in W3 Total cache plugin will make webpage crash sometimes. So turn on the minify option in cloudflare.